Why Gen5 SSDs Need Rethinking
We rethink Gen5 NVMe cooling because speeds now push drives past 100°C throttling thresholds; sustained performance, lifespan, and platform compatibility suffer. We explain practical cooling choices, trade-offs, and ecosystem impacts so users get quieter, faster, longer-lasting storage with clearer guidance.
What We Need Before We Start

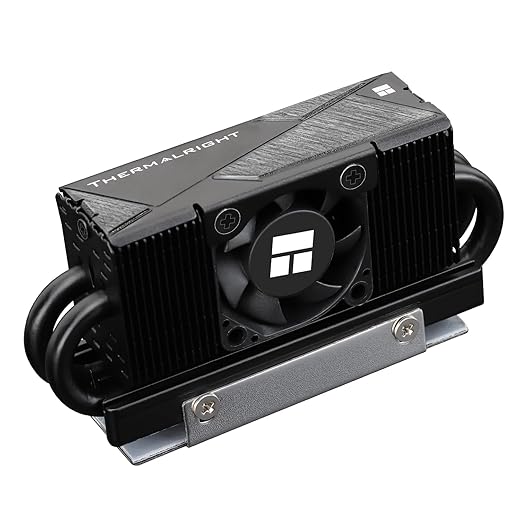
Install Thermalright HR-10 M2 Heatsink with Cooling Fan on Gigabyte Aorus Elite WiFi 7 ICE
Assess Your System and the SSD
Do we really know whether the board can feed a Gen5 drive at full speed?Audit your platform before you buy: Gen5 bandwidth increases heat, so confirm the motherboard or laptop supports PCIe Gen5 x4 M.2, that enough CPU or chipset lanes are available, and that the slot has physical clearance for a proper heatsink.
We start by auditing the platform so our install isn’t hamstrung by a poor match. Confirm your motherboard or laptop supports PCIe Gen5 x4 M.2, that enough CPU or chipset lanes are available, and that the slot has physical clearance for a proper heatsink. Check BIOS updates and drive compatibility lists from the OEM—recent firmware often fixes thermal throttling or power management bugs. For laptops, verify cooling capacity and whether the chassis geometry allows attaching a pad or low-profile cooler. That clarity helps us pick drives that deliver sustained throughput, manageable noise, and better long-term value and reliability.
Plan the Cooling Strategy
Should we trust the tiny stock heatsink, or go all-in with active solutions?Decide the cooling approach before we touch the drive. Gen5 SSDs dump more heat under sustained transfers, so treat cooling as part of the purchase, not an afterthought.
Choose from these common options:
Consider form‑factor limits: a thin laptop usually only accepts pads or integrated spreaders; a desktop lets us use vapor chambers or small blowers. Evaluate airflow patterns, fan curves, and acoustic budgets — a 30mm targeted fan often outperforms a passive block in confined builds. Check vendor guidance for approved coolers and monitor thermal telemetry via drive or motherboard utilities; ecosystem support now meaningfully affects real‑world performance.
Prepare the Drive and Cooling Components
Small prep steps avoid big headaches—what we never skip.Update the SSD firmware and download the latest motherboard BIOS before we open the case — use the vendor’s utility or a USB boot tool so we don’t risk interrupted updates.
Test-fit the drive and chosen heatsink or pad on a bench. Trim pads to cover the controller and NAND only; avoid SMDs and exposed traces. Use the manufacturer’s recommended pad thickness — too thin creates hotspots, too thick prevents contact.
Clean mating surfaces with 90–99% isopropyl alcohol. Align standoff positions and confirm screw lengths to avoid PCB damage.
Check integrated shields or large coolers for mounting clearances and follow thermal-adhesive instructions exactly (example: some vendors require 24 hours cure).
Map chassis airflow and decide fan/duct placement to match the drive’s thermal profile.

Install the SSD and Heatsink
Can installing an M.2 be satisfying? Yes—if we do it like this.Power down, unplug, and ground ourselves before handling the SSD to avoid ESD damage. Remove the M.2 slot cover or bracket and unscrew the standoff so the slot is ready.
Insert the module at a shallow angle until the contacts seat. Lower the drive and secure it with the standoff screw—finger-tight plus a quarter-turn is usually sufficient; avoid over-torquing to prevent PCB stress.
Apply the thermal pad to the labeled region or press the heatsink per manufacturer instructions, ensuring continuous contact without compressing nearby components. For active solutions, mount fans or ducts to direct airflow over the heatsink; Gen5 throughput makes sustained cooling essential for real-world performance.
Reinstall any shield or bracket and route cables to preserve case airflow. Boot into BIOS to confirm NVMe detection, set PCIe link to Gen5 if required, and enable motherboard M.2 cooling controls. Test boot and record temperatures for baseline monitoring.
Validate Thermal Performance
We stress it—because peak numbers mean little if sustained speeds collapse.Run sustained sequential and random IO tests with tools like fio (e.g., 128K sequential write for 30 minutes), CrystalDiskMark, or vendor utilities. Log junction temperatures and throughput for our records.
Observe whether sustained write drops align with temperature spikes. Check SMART attributes and manufacturer thermal thresholds—drives can report throttling before speeds fall.
If temperatures cross limits, iterate:
Balance gains against added noise—our tests favor small fans with targeted ducts for the best throughput‑to‑noise ratio. Document results, update firmware and motherboard drivers, and consider chassis changes if temperatures remain high. Validating performance ensures our Gen5 investment sustains real-world speeds and competes effectively.
Maintain and Update for Long-Term Performance
Treat the SSD like a tiny rocket engine: maintenance pays dividends.Schedule a maintenance routine and check SSD firmware and motherboard BIOS for updates; vendors refine thermal behavior and power management. For example, a firmware patch can lower junction temps and restore sustained writes.
Schedule these checks into our ownership calendar so firmware, cooling, and performance evolve together.
Wrap-up: Performance That Lasts
By planning, installing precisely, and using targeted airflow, validated heatsinks, and firmware-aware upkeep, we unlock Gen5 throughput and silence; try it, share results, join our conversation.

Chris is the founder and lead editor of OptionCutter LLC, where he oversees in-depth buying guides, product reviews, and comparison content designed to help readers make informed purchasing decisions. His editorial approach centers on structured research, real-world use cases, performance benchmarks, and transparent evaluation criteria rather than surface-level summaries. Through OptionCutter’s blog content, he focuses on breaking down complex product categories into clear recommendations, practical advice, and decision frameworks that prioritize accuracy, usability, and long-term value for shoppers.